

9.20.2013
Celebration time
9.10.2013
View on my morning run

One thing I've found I do like about Oklahoma: Summer = Sunflowers. I do love me some sunflowers. And yes, I stopped running so I could take pictures. Good thing I run with my iphone :)
9.05.2013
DIY Earring Display Stands from Coat Hangers
There are a lot of beautiful jewelry display stands on the market, but a lot of them can be quite pricey. Not exactly rolling in the dough myself, I decided to try and make my own! Like me, you'll probably have most of what you need lying around the house already. The only things I purchased to make these were the wooden wheels for bases and the spray paint. That's it. Less than $10 and so far I've made 4 stands with supplies to spare!
What you'll need:
-Wire coat hanger
-Small wooden wheels with pre-drilled holes (pictured below-I found mine in the wood section at Hobby Lobby)
-Wire cutters
-Pliers
-Hot glue gun
-Spray paint

I apologize in advance because I got a little excited and didn't start photographing till a couple steps in. The first few are pretty self explanatory though, so here we go:
1) Use your wire cutters to cut off the actual hanging bendy part at the top of the hanger. If your hanger is like mine you'll already have two pieces of wire left (the wire doesn't go all the way through the cardboard bit on mine). Otherwise, employ your wire cutters again and cut down the wire to the desired length. (For a full wire hanger, cutting it in half will make the larger stands shown in the last picture)
2) Use your pliers to straighten out the wire. I used a pair of blunt, wider nosed pliers which made this step super easy but it should work with whatever pair you've got lying around.
Now for pictures!

3)Use your pliers to bend the wire in half. Squeeze the bottom of the V together so that it will fit through the hole in your wooden wheel/base.


Also, FYI (shameless plug in 3... 2... 1...) you can find all of the earrings pictured above in my shop which you can find here!
Did you have fun? I hope so! I know I did! :D
xo
Lindsey
9.03.2013
Broken Bow Lake Trip

Last week we took a trip down to a little town called Broken Bow to hang out with some friends. Above is one of my fav photos from the trip-My husband with our crazy fuzzy, Loki.(Both actually smiling and looking normal. lol) We decided to take the puppymonster with us and she did really great! We've never taken a longish car ride with her and she did much better than expected. It turned out to be a pretty good trip. There was river rafting, great bbq, bonfires, wine, and playtime at the lake with the pups. All in all, great time had by everyone. :)
Here are some more pics from the trip! Enjoy!


(I've started playing around with instagram a lot lately. Love it!)

(Love this one too. Far more typical. Both monsters making faces! Lol :) Also, yay for playing with my new camera!!! :D)
XO
Lindsey :)
8.27.2013
New camera + new blooms = new post!

So I got a new camera for my birthday. Super exciting. My old point and shoot finally died so my hubby got me a shiny new Cannon Rebel T3! Yay!!! Haven't used it for much so far except shooting some photos of my jewelry.
Today though, I noticed there were some new blooms on my day lillies out in the front yard (and some more buds as well!). This is a big deal. You must understand. I've been known to kill cacti. Cacti mind you. I don't even know how... So yeah, super awesome. So I decided that that was a perfect reason to pull out my camera and play around a bit. Above is the result. Zero editing, straight from the camera. I think for starters that's pretty good, don't you? :D
I'm hoping to make this a new start for this blog. I know I've restarted a bazillion times already... And I can't promise this wont turn out like the previous times. I always have trouble coming up with something to write about. But I really want to explore more with my camera and I have some personal exploring to do as well. So perhaps we can squeeze a couple posts out of this, yes?
Fingers crossed.
6.09.2013
Brass Pendant- How I Did It!
Heya! So with all the new jewelry going up in my shop, I thought you might enjoy a little behind the scenes peek on how some of it is made! The following is a pendant that I made for myself and I'll show you how I did it!
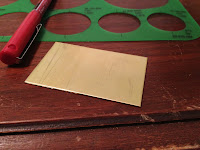
1- Starting with a flat brass sheet. I believe it was somewhere around 18-20 gauge.


2- I used my super nifty circle cutter (my Christmas gift last year!) and a heavy brass hammer to cut the circle for the pendant out of the sheet. The cutter can cut circles of many different sizes. You secure the metal between the two steel plates with the corresponding hole size you'd like to cut. You then insert the die (the cylindrical piece in the first and third pictures that actually does the cutting) into the hole and pound the ever loving crap out of it till it cuts all the way through the metal!

3- Sand and polish till shiny! (I shall spare you the tedium by only using one picture. But please note, this takes FOREVERRRRRRRR!!!) Basically you work your way down through increasingly smoother grits of sandpaper (I use about three different ones) and then polish and smooth further with steel wool.


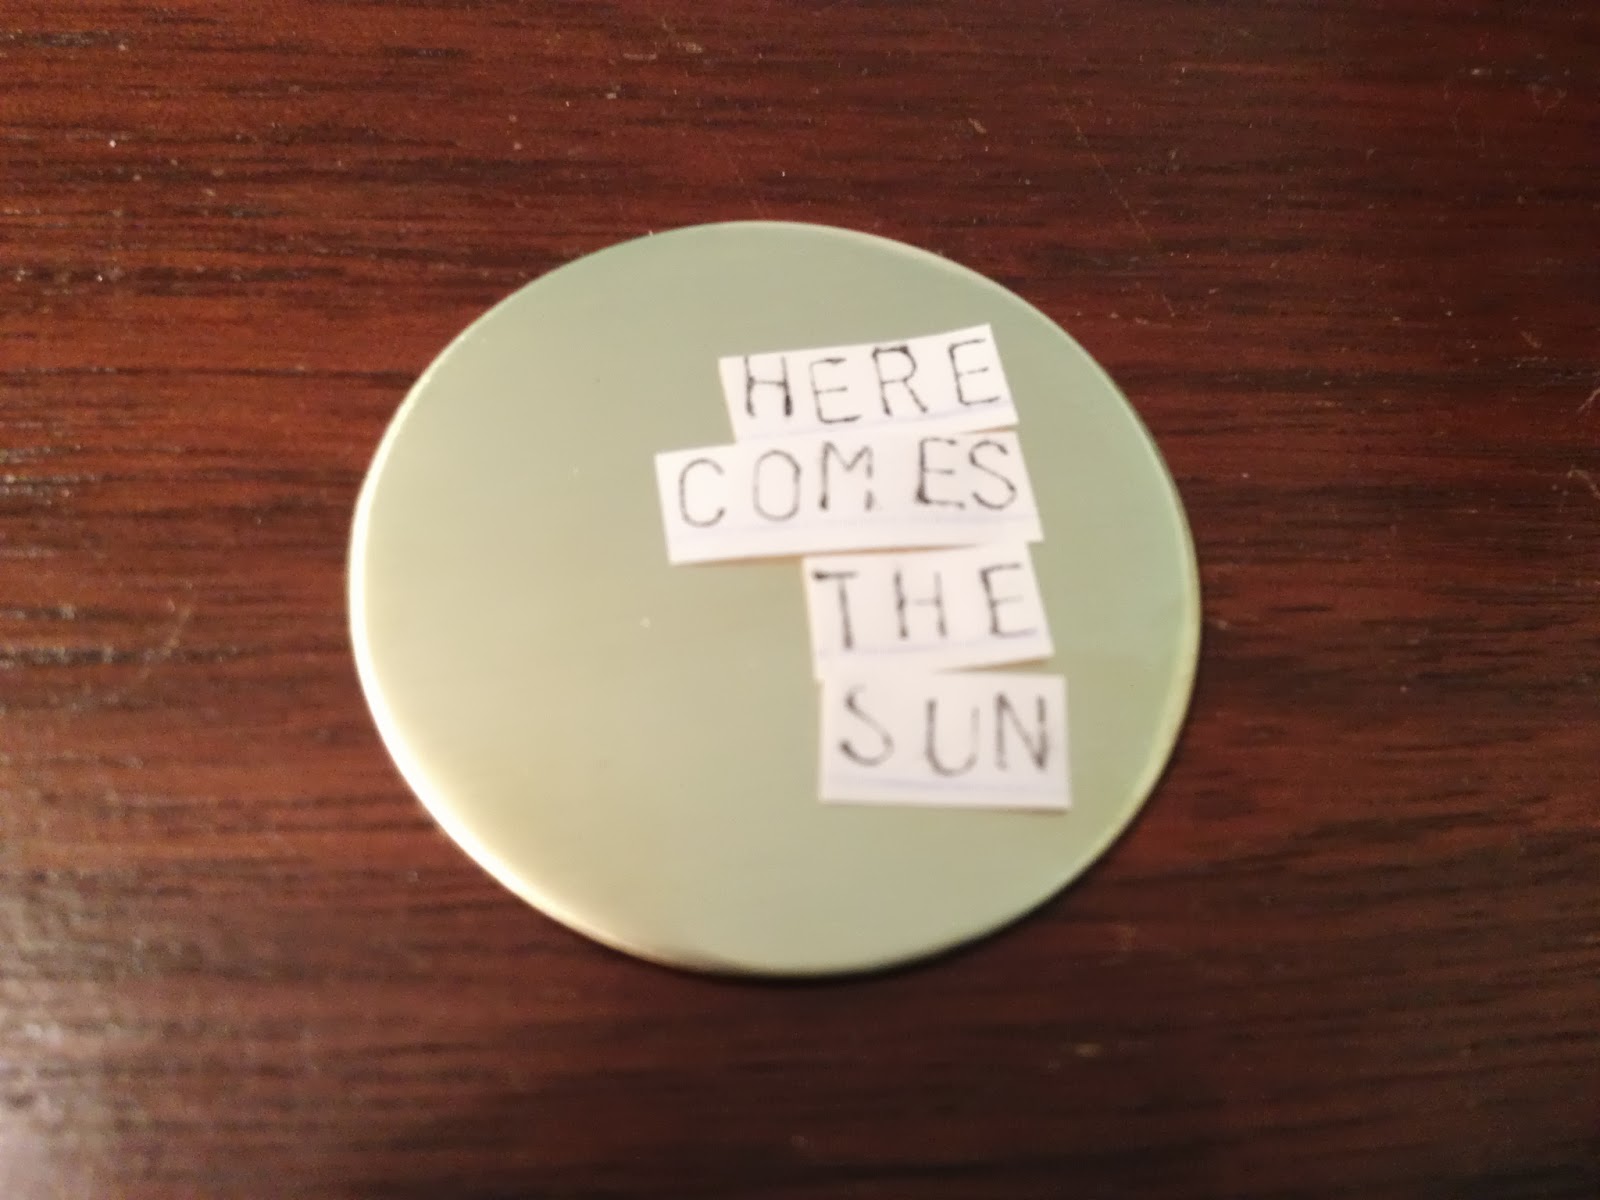
4- I pulled out my metal stamps and used an ink pad to stamp the desired phrase onto paper. ("Here comes the sun" from one of my favorite Beatles songs) Cut up, it helps me decide the placement of the stamps on my piece and to make sure everything will fit.


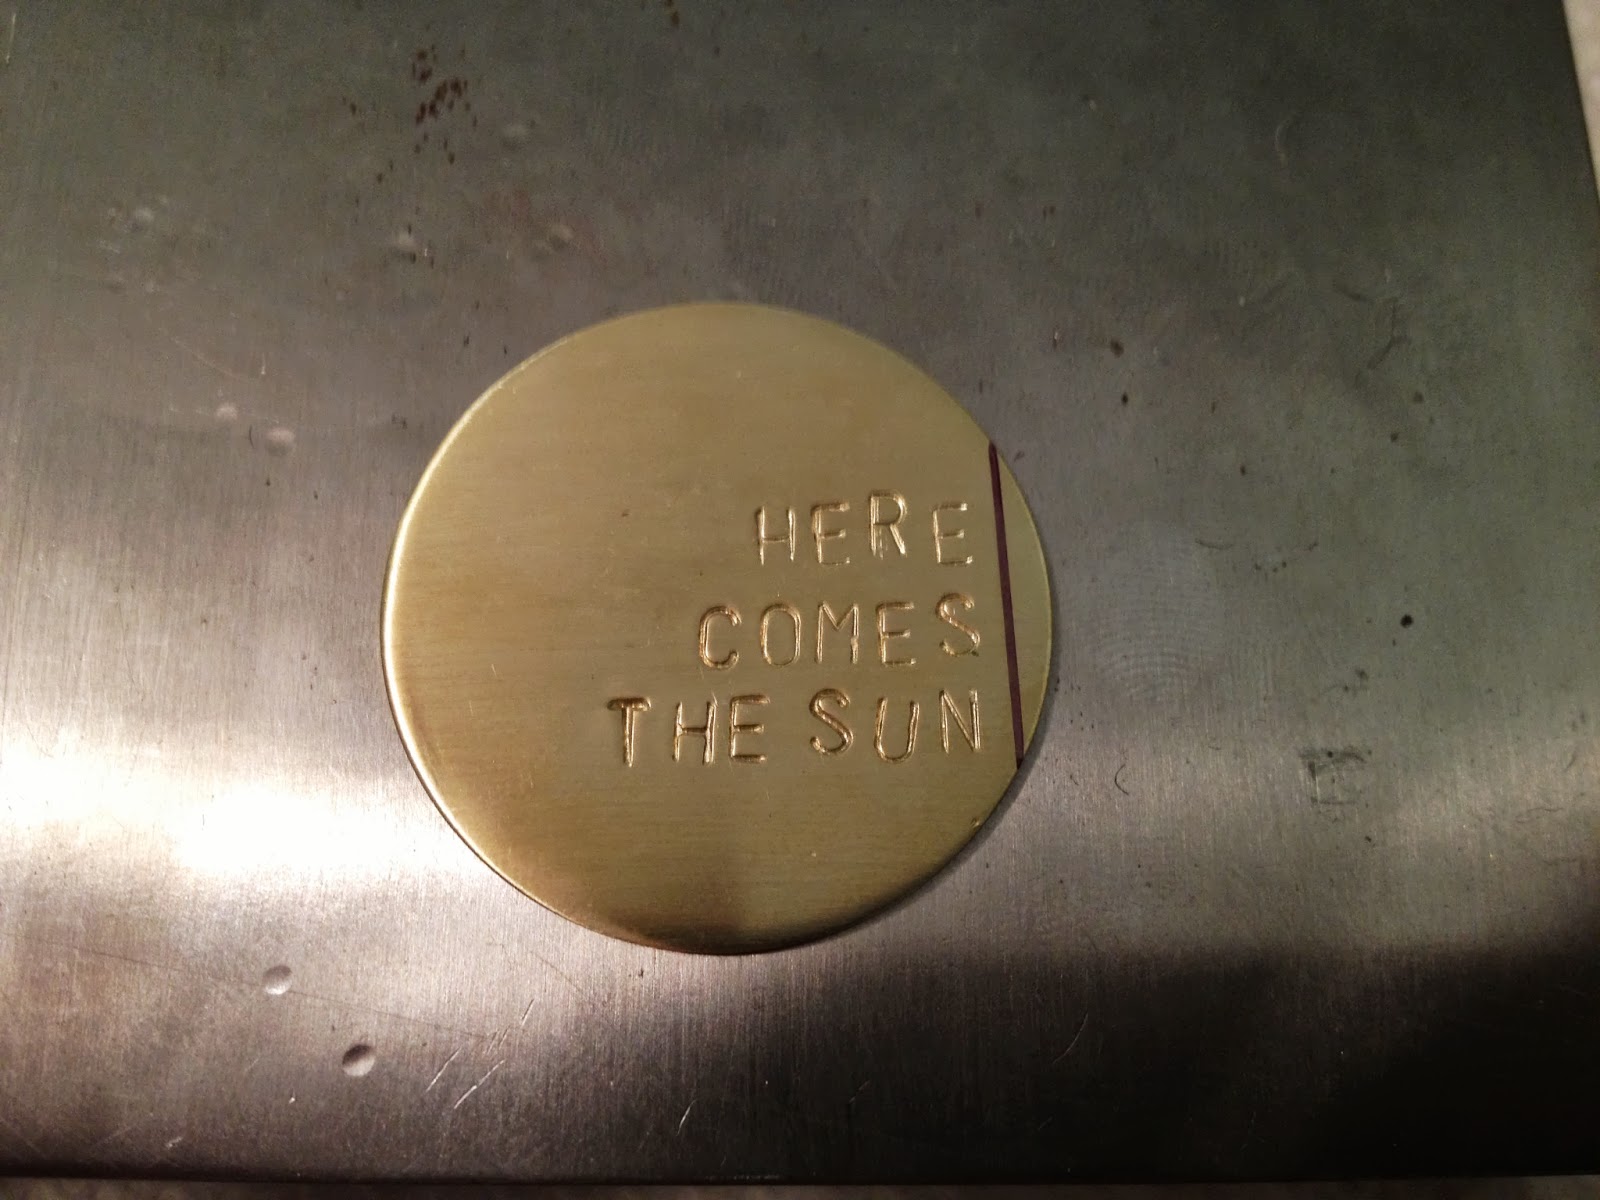
5- Once I had decided my placement, I drew a guide line down the right
side of the circle. I used this to line up my stamps starting from right
to left on each line. The stamping is done on a steel block (which is the shiny silver behind the brass). This gives you a nice strong base. Wood and other softer surfaces have too much give and bounce and would not produce a clean deep stamp. When the metal is pressed between the steel block and the steel stamp, it is compressed rather than pushed outward thus keeping your piece flat.

6- A bit more sanding and polishing to remove the sharpie line


7- Deciding I wanted it textured, I used another hammer with rounded head to essentially beat the metal into submission :)
This is also done on a steel block (which you can now see the entirety of) for the same reason as above.


8- This nifty little gadget is a metal hole punch. Each end has a different size punch you use the handles to screw down into and cut the metal. Similar concept to the hole cutter only using the pressure from the screw instead of the hammer. (Also, much tinier circles) This is what I used to add the hole in my pendant that it will hang from.

9- Voila! With the addition of a jump ring and a chain, the pendant is ready to wear!
6.02.2013
Deployment Survival 101: Tips For Keeping Your Sanity
 |
| http://www.joyzz.com/article-360.html |
However, instead of focusing on all that, I've decided to share with you some of the ways I've learned about to help cope with the ever looming stress of a deployment. (Excited, aren't you?!)
1) SET UP METHODS OF COMMUNICATION
Before your loved one leaves, set up ways you can communicate. Gone are the days of waiting weeks for letters or phone calls. Skype, Google Chat, and iChat are a few wonderful options that let you actually SEE your loved one even when they're all the way around the world! And don't forget email. Sometimes you or your service member are busy, or your schedules just don't jive. But you can write an email any time of the day! It's always wonderful to wake up to a little note in your inbox :)
2)FIND SOME WAY TO MARK THE PASSAGE OF TIME
.JPG) Before he even left, I made a count down calendar. I printed out each month, colored and decorated, and posted the whole series prominently on my kitchen wall so I cannot help but see it every day. I then scrounged through the house and came up with every picture I had of my husband and I and posted those all around the calendar. Armed with a X shaped stamp and a red stamp pad, every morning when I get up I cross off the day before.
Before he even left, I made a count down calendar. I printed out each month, colored and decorated, and posted the whole series prominently on my kitchen wall so I cannot help but see it every day. I then scrounged through the house and came up with every picture I had of my husband and I and posted those all around the calendar. Armed with a X shaped stamp and a red stamp pad, every morning when I get up I cross off the day before. At first, I'll admit, it's a little depressing. When you've only got a few Xs and a whole lot of blank calendar it may look like forever. Pretty quickly though, it becomes routine. Each red X brings the satisfaction of knowing you survived another day. And hey, if you did it yesterday, today should be a piece of cake. (That's the theory anyway. That is what we tell ourselves). And now, I've got two whole months worth of little red Xs and that makes me feel pretty good. Cuz hey, if I did it last month, this month should be a piece of cake.

Point is, find a way to mark the passage of time. It helps. If you can SEE the time trickling away it doesn't feel so much like forever. Here are some other fun ways I've seen to count down the time:
-Get two jars. Fill one jar with marbles (or other small objects) for each day of the deployment. Every day, move a marble to the other jar.
-Fill a jar with candy or some other small treat, one for each day. Every day, treat yourself and watch the candy and the time disappear! (I've heard this one is especially popular with the kiddos ;) )
-Get or make a countdown perpetual calendar with blocks you turn to change the numbers. Or a chalkboard you can change the number on every day.


(Etsy.com has so many WONDERFUL options if you don't want to make your own! Find these calendars at: LEFT HERE, RIGHT HERE)
3)STAY BUSY
I had a lot of people tell me this before the deployment started. "Yeah, right" I thought "of course I'll be busy! I have to be two people!" What I didn't realize at the time was that what was really meant was 'Stay busy... WITH THINGS YOU ENJOY.' If its all errands, work, kids and cleaning the house... it will feel like forever. You have to have fun! I know it feels really weird at first. How can you be having fun when your loved one is over there doing what they're doing??? But really, would they want you to sit around and mope, feeling guilty the whole time they're gone? Of course not. Use the time you have to do or catch up on things you wouldn't normally have time for.
 |
| http://iwastesomuchtime.com/on/?i=40156 |
I once had a 'Seasoned Spouse' as they are called (ie: spouses with several years and deployments under their belts) tell me every time her husband left she went and found a new class to take. Currently, she told me, she was learning to play the trumpet. Purely because she could. And why not? Your life doesn't stop because your loved one is away. And it shouldn't.
.JPG) |
| http://www.mudfactor.com/ |
I work from home on my own jewelry business so there was another place that goals could come into play. I've got monthly sales goals I'm working toward and before this deployment is over, I want to have 100 pieces in my shop! I had under 50 when the deployment started and now, two months in, I believe I'm up to 74! Another month or so should meet that goal!
.jpeg)
Perhaps another way to put this is to make what I've heard some spouses call a 'Deployment Bucket List'. Make a list of things you've always wanted to try, or things you want to catch up on. Remember to set attainable goals though. Climbing Mount Everest if you've never hiked a day in your life- probably one you should leave off.
So there you go. That's what I've learned so far. Do you have any tips? How do you survive deployment?
Many happy returns,
Lindsey
Subscribe to:
Posts (Atom)


