9.20.2013
Celebration time

9.10.2013
View on my morning run
One thing I've found I do like about Oklahoma: Summer = Sunflowers. I do love me some sunflowers. And yes, I stopped running so I could take pictures. Good thing I run with my iphone :)
Labels:
instagram,
iphone,
oklahoma,
photography,
run,
running,
summer,
sun,
sunflowers,
sunshine
9.05.2013
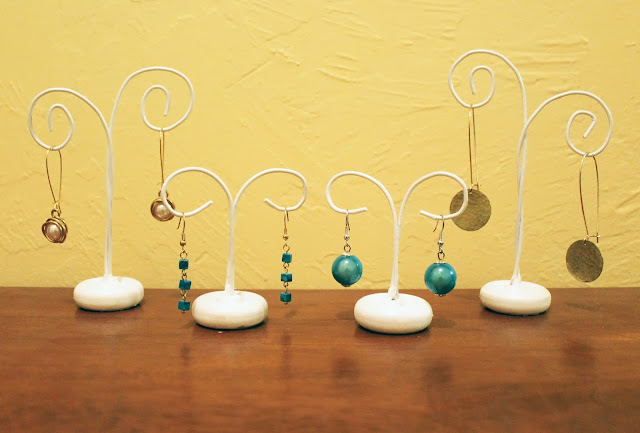
DIY Earring Display Stands from Coat Hangers
There are a lot of beautiful jewelry display stands on the market, but a lot of them can be quite pricey. Not exactly rolling in the dough myself, I decided to try and make my own! Like me, you'll probably have most of what you need lying around the house already. The only things I purchased to make these were the wooden wheels for bases and the spray paint. That's it. Less than $10 and so far I've made 4 stands with supplies to spare!
What you'll need:
-Wire coat hanger
-Small wooden wheels with pre-drilled holes (pictured below-I found mine in the wood section at Hobby Lobby)
-Wire cutters
-Pliers
-Hot glue gun
-Spray paint

I apologize in advance because I got a little excited and didn't start photographing till a couple steps in. The first few are pretty self explanatory though, so here we go:
1) Use your wire cutters to cut off the actual hanging bendy part at the top of the hanger. If your hanger is like mine you'll already have two pieces of wire left (the wire doesn't go all the way through the cardboard bit on mine). Otherwise, employ your wire cutters again and cut down the wire to the desired length. (For a full wire hanger, cutting it in half will make the larger stands shown in the last picture)
2) Use your pliers to straighten out the wire. I used a pair of blunt, wider nosed pliers which made this step super easy but it should work with whatever pair you've got lying around.
Now for pictures!

3)Use your pliers to bend the wire in half. Squeeze the bottom of the V together so that it will fit through the hole in your wooden wheel/base.
5) These are the little wheel things I was telling you about. They come in a little baggie of about a million for only $3.99. (And by a million, I mean somewhere around 20.) Now for the funnest (yes, I said funnest) part! Glue gun! Who doesn't love playing with hot glue? Seriously? If you don't (Blasphemer!), I hereby strip thee of the title Crafter! Anyhoo, moving on. Warm up your hot glue gun and squirt a glob down into the hole of your wheel. Before the glue sets, push center of your wire stand down through the hole. Some glue will probably just squirt out the bottom. I just wiped it off with my finger. So what if its hot? I'm just that awesome.
6) You should now have something that looks a bit like this. Now you could leave it like that. I wanted mine to be extra snazzy though, so I spray painted them white. You know, for uniformity and all that jazz. Anyway, spray paint them, let them dry, aaaaaaaaaaand...
VOILA! You've made your very own earring display stands! Hang up some darn earrings already!
Also, FYI (shameless plug in 3... 2... 1...) you can find all of the earrings pictured above in my shop which you can find here!
Did you have fun? I hope so! I know I did! :D
xo
Lindsey
9.03.2013
Broken Bow Lake Trip
Trying out a new style. I've come across several blogs that I enjoy that feature tons of pictures. Sometimes ONLY pics, and I love getting a glimpse into people's every day lives. So. Here we go.
Last week we took a trip down to a little town called Broken Bow to hang out with some friends. Above is one of my fav photos from the trip-My husband with our crazy fuzzy, Loki.(Both actually smiling and looking normal. lol) We decided to take the puppymonster with us and she did really great! We've never taken a longish car ride with her and she did much better than expected. It turned out to be a pretty good trip. There was river rafting, great bbq, bonfires, wine, and playtime at the lake with the pups. All in all, great time had by everyone. :)
Here are some more pics from the trip! Enjoy!
(I've started playing around with instagram a lot lately. Love it!)
(Love this one too. Far more typical. Both monsters making faces! Lol :) Also, yay for playing with my new camera!!! :D)
XO
Lindsey :)
Labels:
adventures,
broken bow,
lake trip,
Loki,
mini-vacation,
nature,
oklahoma,
relaxation,
river rafting,
siberian husky,
vacation
Subscribe to:
Comments (Atom)


